Cutting Herbs

Since I am still working in the herb garden, I thought it would be appropriate to talk about cutting herbs.  Sometimes chopping a big batch can be a chore, and the food processor tuns them to mush, so I use a pizza wheel which easily slices the mounds of herbs without crushing them and gives me more control than a knife.

Share this:
Share this page via Email Share this page via Stumble Upon Share this page via Digg this Share this page via Facebook Share this page via Twitter
Posted in Kitchen Tips | Tagged , , | Leave a comment

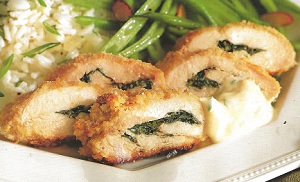
Chicken and Basil Roulades

Chicken Roulades

Chicken Roulades


I was in the garden working with my planters of Basil and Chives this morning which made me think of this recipe. This is a great dinner with friends as you can make it in advance and keep it in the fridge. When you are ready pull it out of the fridge and allow to lose the chill, and then place in the pre-heated oven 30 minutes before you need it. The tang of the mustard against the sour of the yogurt and the sweet of the basil makes a perfect blend of flavors. I also make a lot more than I need as I put the uncut breasts in the fridge and warm them up the next day and it is just as good. A beautiful presentation, they will think you worked all day on this recipe.


Sauce:


1 tablespoon Dijon mustard

1/2 cup low fat plain yogurt
2 teaspoons chopped fresh chives


Chicken:

2 tablespoons unsalted butter, melted

2 tablespoons chopped fresh basil

4 skinless, boneless chicken breast halves, about 6 oz , (185 g) each, pounded to 3/8 inch (1 cm) thickness. I pound mine out between two sheets of wax paper so it is not as messy.

Salt and freshly ground pepper

1/3 cup low fat plain yogurt

1 teaspoon Dijon mustard

1 cup (2 oz/60 g) fine fresh bread crumbs

1/2 cup (2 oz/60 g) grated Parmesan or Pecorino Romano cheese


Use slices of any firm-textured coarse bread, some that is 1 or 2 days old is perfect. If the slices are very fresh, lay them on a countertop and leave overnight to dry out. Tear the slices into large pieces-don’t bother to remove the crusts. Process in a food processor or blender to the desired texture, from coarse to medium to fine.


To make the sauce, stir together the 1/2 cup yogurt, 1 tablespoon mustard, and the chives in a small bowl. Let the sauce stand at room temperature to lose its chill while the chicken breasts bake.


Preheat the oven to 400 F (200 C). Lightly brush a baking sheet (preferably nonstick) with some of the melted butter.


Sprinkle 1 teaspoons of the basil in the center of 1 chicken breast and season with salt and pepper. Fold in the short ends of the breast about inch (12 mm). Starting at a long side, roll up the breast, enclosing the basil. Repeat with the remaining breasts.


In a shallow bowl, stir together the 1/3 cup yogurt and 1 teaspoon mustard. In a shallow dish, stir together the bread crumbs and cheese. Roll each chicken breast in the yogurt mixture, and then coat with the crumb mixture. Place on the prepared baking sheet and drizzle with the remaining melted butter.


Bake until the coating is golden brown and the chicken shows no sign of pink when cut into the center, about 30 minutes. Serve hot, with a dollop of the sauce on the side.

Share this:
Share this page via Email Share this page via Stumble Upon Share this page via Digg this Share this page via Facebook Share this page via Twitter
Posted in Recipes | Tagged , , , , , , | Leave a comment

Kill weeds with vinegar

As spring has sprung in many places, it is also that time of year for weeds.  So here is a tip, when you use vinegar to clean your iron or coffee pot, use the hot vinegar left over to pour on your weeds.  White vinegar is a herbacide and boiling water also kills weeds.

Share this:
Share this page via Email Share this page via Stumble Upon Share this page via Digg this Share this page via Facebook Share this page via Twitter
Posted in Kitchen Tips | Tagged , | Leave a comment

Grasshopper Pie

Grasshopper Pie

Grasshopper Pie


Who remembers the Grasshopper Pie? My grandmother used to make this, but I am sure that many do not remember this blast from the past pie. Back in the day booze in pies was considered chic. The Grasshopper originated as a drink and was later made into a pie. I find the mint and chocolate of the pie a very refreshing dessert.


In this recipe we give you the option of using a creme de menthe (which I do as it does not give the pie a alcohol flavor) or to use a peppermint sauce that we use as a topping for ice cream. I grow a lot of mint, but if you do not have some growing it is easily found in most grocery stores.


If you like an heavier mint flavor try the option of adding the peppermint extract. I use 1/4 teaspoon, but grandma liked 1/2 teaspoon. So it is up to you. Enjoy!


THE CHOCOLATE CRUST
6 tablespoons ( stick) unsalted butter, melted
30 chocolate wafers (enough to make 1 cups crumbs)

FOR THE GRASSHOPPER FILLING
2 ounces white chocolate
1 cup heavy cream
1 envelope unflavored gelatin (2 teaspoons)
1/4 cup milk
2 large egg yolks
2 large eggs
2 tablespoons sugar
1/4 cup Peppermint Sauce (recipe below) or creme de menthe
1/4 to 1/2 teaspoon peppermint extract, for extra zip (optional)

Garnish

Chocolate swirls or sprinkles

1. Make the Chocolate Wafer Crust: Coat a 9- inch pie pan with 2 teaspoons of the butter. In a food processor, chop the chocolate wafers into fine crumbs. Transfer to a small bowl and mix in the rest of the melted butter. Pat the mixture over the bottom and sides of the pan. Chill for at least 30 minutes


2. Set a rack in the middle of the oven and preheat to 350°F. Bake the piecrust for 8 to 10
minutes, until set and dry. Place on a rack to cool.


3. Make the Grasshopper Filling: Finely chop the white chocolate and put it in a medium
bowl. In a small saucepan, over medium heat, bring cup of the cream just to a simmer.
Pour it over the chocolate and stir with a whisk until smooth and blended. Stir in the
remaining cup of cream and refrigerate for 30 minutes, until completely chilled.

 
4. In a small bowl, soften the gelatin by stirring it into the milk. Set aside.


5. Combine the yolks, eggs, and sugar in a medium bowl or the top of a double boiler and
place over slowly boiling water. Whisk until very hot to the touch but not scrambled
(160°F). Remove from the heat and continue to whisk (you may switch to an electric
mixer) until the mixture is thick, doubled in volume, and, when tipped from a spoon, holds
a ribbon shape for 2 seconds, about 2 minutes. Whisk in the Peppermint Sauce and
peppermint extract, if using.


6. Set the bowl of gelatin over simmering water until the gelatin has dissolved, about
1 minute; then whisk it into the egg mixture. Set aside to cool down to tepid


7. Whip the white chocolate cream until just thickened, then fold it into the egg mixture.
Scrape the filling into the pie shell and refrigerate until set, at least 2 hours or overnight.


8. Garnish with chocolate curls or sprinkles.


Peppermint Sauce

2 ounce bunch of fresh mint leaves picked and stems discarded

1/4 cup of water

1/2 cup of sugar

1. In a small saucepan, boil the water and sugar until clear and all crystals are completely
dissolved, about 3 minutes. Set aside to cool.

 
2. Dump the mint leaves into a pot of rapidly boiling water and cook for 1 minute. Quickly
drain the leaves and plunge into a bowl of ice water. Drain and squeeze out any excess
moisture.

 
3. In a blender, process the mint and syrup until smooth. Store in a sealed container. This
sauce will keep for 3 weeks in the refrigerator or 3 months in the freezer


The sauce will be smoothest if it is re-blended the next day when the mint leaves have softened up.

Share this:
Share this page via Email Share this page via Stumble Upon Share this page via Digg this Share this page via Facebook Share this page via Twitter
Posted in Recipes | Tagged , , | Leave a comment

Blackened Seasoning Recipe


Having spent 5 years in New Orleans, and being a fan of spice, I developed a  love for blackened seasoning on chicken, fish, etc.  In the South you can buy Blackened Seasoning in most stores already mixed, but not so much in some other parts of the country.  If you find it in the store it can also be pricey, fo something you can easily do yourself.  So this morning I am making some blackened seasoning that I will put on some chicken before grilling it this evening and putting it on top of a salad.  I also love blackened chicken over a bed of garlic Alfredo pasta with some scallions and fresh tomatoes, but that is for a different recipe.


Here is a warning, I like mine a little warm.  So you might want to experiment with the cayenne and red pepper flakes.


1  T Cayenne

1  T Black Pepper (I use the whole peppercorns)

1  T White Pepper

2  T Crushed Red Pepper

1  T Oregano

1  T Rosemary

1  T Basil

1  T Thyme

1  T Garlic Powder

1  T Salt

2  T Paprika


Mix all of the spices together and place in a spice grinder and process.

Share this:
Share this page via Email Share this page via Stumble Upon Share this page via Digg this Share this page via Facebook Share this page via Twitter
Posted in Recipes | Tagged , , , , | Leave a comment

Greasy Pans?

Greasy pans got you down?  Save your lemons after juicing them, turn them inside out and use them for the initial scrubbing of your greasy pans.  It will remove the stubborn grease and your hands will smell like lemons.

Share this:
Share this page via Email Share this page via Stumble Upon Share this page via Digg this Share this page via Facebook Share this page via Twitter
Posted in Kitchen Tips | Tagged , , , , , | Leave a comment

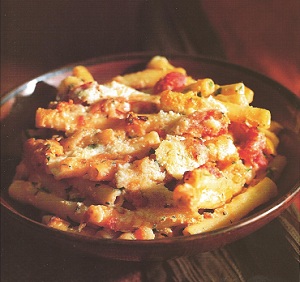
Baked Ziti

Baked Ziti

Baked Ziti

So my friend Amy is having a dinner party tonight and she asked me to bring a Baked Ziti. I love this dish as it is rich in deep flavors that all meld together. If you are a person who likes more of a predominant tomato flavor at the center of your sauce, this is probably not the choice for you. Don’t get me wrong, the tomato is definitely there and you get good flavor from them, but the other flavors take an equal place on the stage with this sauce.


For any good Ziti you need a good sauce. I like this sauce as it has a lot more depth than just a tomato flavor. The aromatics and spices make a great blend to complement the tomato without it being the main flavor. You can use this tomato sauce with pasta or use it in a baked pasta dish such as the Baked Ziti we are doing today. This recipe is a basic and you should experiment varying the flavor to your taste by adding chopped prosciutto or salami, olives, capers, toasted pine nuts, or a splash of cream at the last minute. You can also experiment with different herbs: marjoram, oregano, or tarragon can replace the basil or the parsley. I use a wide and shallow pan so the liquid can evaporate without long cooking, which preserves the bright color and fresh taste. I also keep a few containers of this sauce in the freezer and pull it out and defrost if you need to put together a quick meal.


The Sauce

1/4 cup extra-virgin olive oil, plus extra for drizzling

1 small chunk fatty prosciutto end (optional)

1 onion, finely diced

1 carrot, peeled and finely diced

1 leek, white part only, finely diced

1 small inner celery stalk, finely diced

3 cloves garlic, thinly sliced

4 fresh plum (Roma) tomatoes, peeled and seeded, then diced

1 can (35 oz/1.1 kg) plum (Roma) tomatoes, chopped, with juice

1 bay leaf

2 or 3 fresh thyme sprigs, plus several sprigs for garnish

Salt and pepper

Small handful of fresh flat-leaf (Italian) parsley leaves, coarsely chopped

About 10 fresh basil leaves, coarsely chopped


Add the prosciutto end (if using), the onion, carrot, leek, and celery and saute until just turning lightly golden, about 8 minutes.

Add the garlic and saute without coloring, about 1 minute. Add the fresh and canned tomatoes with juice, bay leaf, and thyme sprigs. Season with salt and pepper to taste and cook, uncovered, until slightly thickened, no more than 20 minutes. The sauce should remain at a lively simmer; stir several times during cooking.

Meanwhile, bring a large pot of water to a boil. Generously salt the boiling water, add the pasta, and cook until al dente, 7-9 minutes.

Remove the prosciutto end (if used), thyme sprigs, and bay leaf and discard. Add the parsley, basil, and a drizzle of olive oil. Taste and adjust the seasoning.

Drain the pasta and put it in a warmed large, shallow bowl. Add the sauce, toss it gently with the pasta, garnish with thyme sprigs, and serve immediately.


Good Baked Ziti is one of my favorites. It is a great meal to serve to vegetarian friends (make sure to omit the prosciutto from the sauce) Baked Ziti can be really good or overcooked and gummy. To make sure yours is good make sure the pasta is initially cooked just until al dente, since it will cook further in the oven. To keep it moist, a pasta dish should be baked for a short time-about 20 minutes and choose a wide, shallow baking dish, as opposed to a small, deep one. This will help the dish heat through quickly and create more surface area for an appealing crunchy top.


To assemble the Ziti

Extra-virgin olive oil for coating and drizzling

1 cup (8 oz/250 g) ricotta cheese

1 egg yolk

1 cup (4 oz/125 g) grated pecorino romano cheese

Generous pinch of freshly grated nutmeg

Handful of fresh flat-leaf (Italian) parsley leaves, coarsely chopped

Salt and freshly ground pepper

1 Ib (500 g) ziti

1/2 Ib (250 g) mozzarella cheese, cut into small cubes


Preheat the oven to 425°P (220°C). Lightly coat a 10-by-12-inch (25-by-30-cm) baking dish with olive oil. Bring a large pot of water to a boil.

Combine the ricotta, egg yolk, 1/2 cup (2 oz 160 g) of the pecorino romano, nutmeg, and parsley in a large bowl. Season with salt and pepper to taste and mix to blend.

Generously salt the boiling water, add the pasta, and cook until al dente, 12-16 minutes. Drain well. Put the pasta in the mixing bowl with the ricotta mixture. Toss well. Add the heated tomato sauce and the mozzarella and toss again, briefly.

Transfer the mixture to the prepared baking dish and smooth the top. Sprinkle the remaining grated cheese over the top and drizzle with olive oil. Bake, uncovered, until bubbling hot and lightly browned, about 20 minutes. Let rest for 3-4 minutes before serving.

Share this:
Share this page via Email Share this page via Stumble Upon Share this page via Digg this Share this page via Facebook Share this page via Twitter
Posted in Recipes | Tagged , , , | Leave a comment

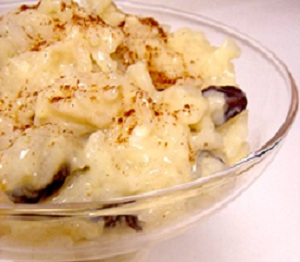
Creamy Rice Pudding

Creamy Rice Pudding

Creamy Rice Pudding

As a kid I thought that Rice Pudding was this awful pasty substance that no one should be forced to eat. I was well into my 30s before I found out that a good Rice Pudding recipe can be delicious. I have tried many of them over the years, and I have to say this is my favorite. I hope you think so too.

Prepare 25 minutes
Cook 20 minutes
Serve 45 minutes

Ingredients
• 3/4 cup uncooked white rice
• 2 cups milk, divided
• 1/3 cup white sugar
• 1/4 teaspoon salt
• 1 egg, beaten
• 2/3 cup golden raisins
• 1 tablespoon butter
• 1/2 teaspoon vanilla extract

Directions
1. In a medium saucepan, bring 1 1/2 cups water to a boil. Add rice and stir. Reduce heat, cover and simmer for 20 minutes.

2. In another saucepan, combine 1 1/2 cups cooked rice, 1 1/2 cups milk, sugar and salt. Cook over medium heat until thick and creamy, 15 to 20 minutes. Stir in remaining 1/2 cup milk, beaten egg and raisins. Cook 2 minutes more, stirring constantly. Remove from heat, and stir in butter and vanilla. Serve warm.

Share this:
Share this page via Email Share this page via Stumble Upon Share this page via Digg this Share this page via Facebook Share this page via Twitter
Posted in Recipes | Tagged , , , , | Leave a comment

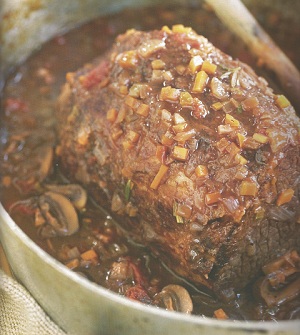
Italian Pot Roast

Italian Pot Roast

Italian Pot Roast

Welcome to another Monday. In the deep south Monday’s were wash day, so you always had red beans and rice which could be prepared the day before. We will post our favorite red beans and rice recipe later, but today we wanted a recipe that was easy to do, could be done in advance, and makes multiple meals, so we chose to do an Italian Pot Roast.

I love a recipe that can be prepped early. I personally do it early in the morning and put in the slow cooker for 10 hours, but you can just as easily do it in the oven in 4 hours. This recipe also makes great leftovers that can be repurposed into other fabulous meals. I freeze the sauce and pull it out at a later date for a great pasta sauce. The leftover meat works great for beef fajitas, Philly cheese steak sandwiches, etc. This roast has great flavor and is extremely tender.

Prepare 45 minutes
Cook 4-10 hours
Serves 6-8

1/4 cup all purpose flour
Salt and freshly ground pepper
1 eye of round roast, about 4 lb
2 tablespoons unsalted butter
2 tablespoons canola oil
6 oz (185) pancetta, finely chopped
2 carrots, finely chopped
1 onion, chopped
1 rib celery, thin slices
1 clove garlic, minced
1/2 lb assorted fresh mushrooms, brushed clean, stems removed, and thinly sliced
2 cups hearty red wine, such as Chianti
1 cup beef broth
2 tomatoes, peeled, seeded and chopped ( I use canned diced)
1 tablespoon chopped fresh rosemary

On a plate, stir together the flour, 1 teaspoon salt, and 112 teaspoon pepper. Turn
the roast in the seasoned flour, shaking off any excess. In a large frying pan over
medium-high heat, melt the butter with the canola oil. Add the roast and cook,
turning occasionally, until evenly browned on all sides, 5-7 minutes. Remove from
the pan and set aside.
Add the pancetta to the pan and saute over medium-high heat, until the fat is
rendered, about 5 minutes. Using a slotted spoon, transfer to a paper towel plate
and set aside.
Pour off all but 1 tablespoon of the fat in the pan. Add the carrots, onion, and
celery and saute over medium-high heat until softened, about 5 minutes. Add the
garlic and cook for 1 minute. Add the mushrooms, cover, and cook until they begin
to release their liquid, about 5 minutes. Reduce the heat to medium, uncover,
and cook, stirring frequently, until most of the liquid has evaporated, 10 minutes.
Pour in the wine and deglaze the pan, stirring and scraping up the browned bits
on the bottom of the pan with a wooden spoon. Stir in the broth, tomatoes, and
rosemary and bring to a boil. Stir in the reserved pancetta and season with salt
and pepper.

Oven: Preheat the oven to 325 F (165 C) Transfer the roast to a large dutch oven . Pour in the wine and vegatable mixture. Cover and cook, turning occasionally, until roast is tender, about 4 hours.

Slowcooker: Transfer the roast to a slow cooker and pour in the wine and
vegetable mixture. Cover and cook, turning occasionally, until the roast is tender,
10 hours on the low-heat setting.
Transfer the roast to a cutting board and cover with aluminum foil to keep warm.
If the sauce is too thin, pour the cooking liquid into a saucepan, bring to a boil
over high heat and cook until it thickens slightly to a sauce consistency, about
10 minutes. Taste and adjust the seasonings with salt and pepper if necessary.
Using a sharp knife, cut the roast into thick slices. Arrange the slices on a warmed
platter or plates, top with the sauce, and serve at once.

Share this:
Share this page via Email Share this page via Stumble Upon Share this page via Digg this Share this page via Facebook Share this page via Twitter
Posted in Recipes | Tagged , , , | Leave a comment

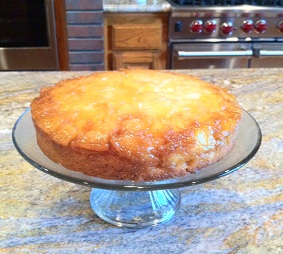
Pineapple Upside-Down Cake

Pineapple Upside Down Cake

Pineapple Upside Down Cake

Pineapple upside down cake was a real treat when I was a kid. The vanilla favor of the cake combined with the citrus flavor and texture of the pineapple and the gooeyness of the brown sugar all combine to give a perfect comfort food for your taste buds.

Prepare 30 minutes plus 2 hours of cooling time
Bake 40-45 minutes
Serves 8 -10

1 2/3 cups all-purpose flour
1 1/2 teaspoons baking powder
1/4 teaspoon baking soda
1/4 teaspoon salt
1/2 fresh pineapple, halved lengthwise cored and peeled
1 1/2 sticks (3/4 cup) unsalted butter, softened
1/2 cup packed light brown sugar
2/3 cup granulated sugar
1 teaspoon pure vanilla extract
2 large eggs
2/3 cup well-shaken buttermilk

1. Put oven rack in middle position and preheat oven to 350 F
2. Sift together flour, baking powder and soda and salt into a bowl.
3. Cut pineapple crosswise into l/4-inch-thick wedges.
4. Butter a 9-inch round cake pan (2 inches deep) lightly on side and generously on bottom of pan using 1/2 stick butter.
5. Sprinkle all of brown sugar evenly over bottom and arrange pineapple over it, starting in center of pan and overlapping slices slightly.
6. Beat together remaining stick butter, granulated sugar, and vanilla with an electric mixer at medium speed until light and fluffy, about 2 minutes, then add eggs l at a time beating well after each addition. Reduce speed to low and add flour mixture alternately with buttermilk in batches beginning and ending with flour and mixing just until batter is smooth.
7. Spread batter evenly over pineapple and bake until a wooden pick inserted in center of cake comes out clean, 40 to 45 minutes. Cool 15 minutes in pan in a rack, then invert cake onto a plate and remove pan. Cool to room temperature.

Share this:
Share this page via Email Share this page via Stumble Upon Share this page via Digg this Share this page via Facebook Share this page via Twitter
Posted in Recipes | Tagged , , , | Leave a comment