Strawberry Pie

As I was driving over the grade this morning into the flat farmlands the wonderful smell of strawberries being harvested wafted into my car. I love fresh strawberries, so I am very lucky to be able to get them fresh directly from the farm. This recipe marries two of my favorite things, shortbread cookies and strawberries. Add a little whipped cream and enjoy!


Crust

1 (5-oz) package Lorna Doone or other shortbread cookies
2 Tbsp sugar
2 Tbsp cold unsalted butter, cut into pieces

Pie

2 Ib strawberries, hulled
3/4 cup sugar
1/3 cup fresh lemon juice
1 envelope unflavored gelatin


  1. Preheat oven to 350°F and place the rack in middle.
  2. Add the cookies to a food processor and pulse into fine crumbs. Add the sugar and butter and pulse until combined. Press the crumb mixture evenly onto bottom and sides a 9-inch pie plate and bake until golden, about 15 minutes. Place on a rack and cool.
  3. Select 15-20 large strawberries as close to same size as possible and set aside. Cut the remaining berries into 1/4 -1/2 pieces and toss with sugar and lemon juice. Let stand, stirring occasionally for 30 minutes until the berries are in a good amount of juice. Pour the berries into a sieve over a large glass measuring cup. Once the liquid has drained off, put the berries in a large metal bowl and set aside.
  4. To the berry liquid, add enough water to measure 2 cups of liquid. Transfer the liquid to a medium saucepan. Sprinkle the gelatin over the liquid and let soften for 1 minute. Bring the liquid to a simmer, stirring until the gelatin has dissolved. Remove from the heat and add the diced berries to the liquid and then transfer the mixture back to the metal bowl and set it into an ice bath, stirring frequently until mixture begins to mound, 20 to 30 minutes.
  5. Put 1/2 cup filling into piecrust and arrange the whole berries with the stem ends down in the filling. Spoon remaining filling in and around the whole berries to fill the pie shell. Chill the pie until the filling is set, at least 4 hours.
Share this:
Share this page via Email Share this page via Stumble Upon Share this page via Digg this Share this page via Facebook Share this page via Twitter
Posted in Recipes | Tagged , , | Leave a comment

Coffee Grounds to Remove Odor

Do you ever have a hard time getting the smell of onions or fish off of your hands no matter how many times you wash them?  You can scrub your hands in the coffee grounds saved from your morning coffee and it will remove the odor.

Share this:
Share this page via Email Share this page via Stumble Upon Share this page via Digg this Share this page via Facebook Share this page via Twitter
Posted in Kitchen Tips | Tagged , , | Leave a comment

Glazed Pork Chops


When I go to the butcher I like to have him cut some chops for me 1 inch to 1 1/4 inch thick.  My friend Janine gave me a recipe for glazed boneless pork chops that has a blend of wonderful flavors.  I like mine thicker, but this recipe works well with thinner ones too, just make sure not to go over 140-145 degrees.  I like my chops medium so I cook them until a thermometer in the center registers 140 degrees.  Most authorities say 140 to 145 and at least 3 minutes of rest time.  We will give it a little more rest.


The blend of flavors in this glaze is marvelous. It combines a sweet caramelized brown sugar with a slight undertone of the fruity apple and a zing from the vinegar.


1/2 cup distilled white or cider vinegar

1/3 cup brown sugar

1/3 cup apple juice or cider

2 tbsp Dijon mustard

1 tbsp soy sauce

1/8 tsp cayenne

4 boneless pork chops

1 tbsp vegetable oil

salt

pepper


Combine the vinegar, brown sugar, apple juice, mustard, soy sauce and cayenne in a bowl. Mix together and set aside.


Pat the chops dry with paper towels and then season with salt and pepper.


Heat the oil in a heavy skillet over medium high heat until it starts to smoke.  Add the chops to the pan and cook on the first side until well browned about 4-5 minutes.  Turn the chops over and cook on the other side for 1 minute.


Remove the chops from the pan and place on a plate.  Remove any excess oil from the pan.  If your chops are thin, you should check them now for the internal temperature.  When they are at 140 degrees they do not need further cooking.  If your chops are thicker or need further cooking return them to the pan, heavily browned side up, add the glaze mixture and cook until your chops reach 140 degrees.  When they arrive at that temperature remove them to a plate, cover with foil, and allow to rest for 5 minutes.


Return glaze to the stove and cook over medium heat until the glaze is thick and a dark caramel color.  Take off of the heat, place the chops in the glaze and flip to thoroughly coat both sides. Put the chops on a platter, well browned side up, and spread remaining glaze over the chops.  Serve immediately.


Share this:
Share this page via Email Share this page via Stumble Upon Share this page via Digg this Share this page via Facebook Share this page via Twitter
Posted in Recipes | Tagged , , | Leave a comment

Homemade Scrub Pad

Hate to waste things?  When you buy a bag of onions, the mesh of the bag that they come in makes a great covering for a sponge to make into a scrub pad.

Share this:
Share this page via Email Share this page via Stumble Upon Share this page via Digg this Share this page via Facebook Share this page via Twitter
Posted in Kitchen Tips | Tagged , , | Leave a comment

Broken Glass Salad


For our retro recipe of the week we wanted something summery,cool, light and refreshing so we chose a broken glass salad.  Certainly not gourmet cuisine, but most retro favorites were not.  I know there will be some of you who are horrified that I am giving you a Jell-o recipe.  For those of you who remember the blast from the past Jell-o recipes that were all the rage in times gone by, you are probably going to be happy to have found this again.  For those of you who remember Jell-o as what you got on your cafeteria or hospital tray, please forgive the indulgence into a favorite from a long time ago and give it a try.


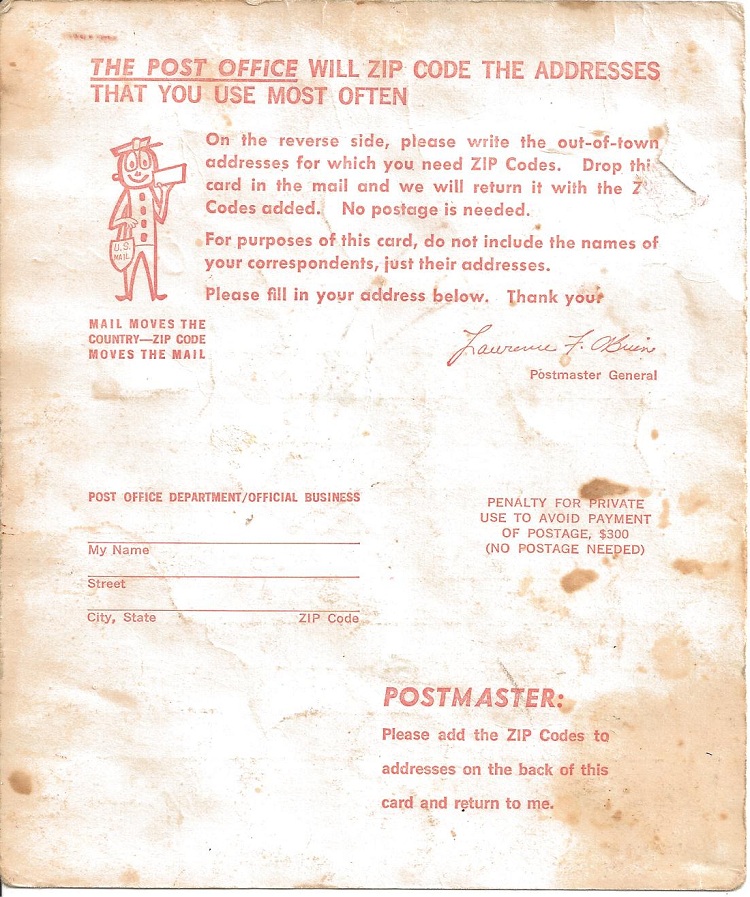
My grandmother used to make this for every holiday.  Her recipe was written on a post office form 3759 from 1966 that you would fill in and drop in the mail to request a zip code of an address from the US Postal Service.  For those of you who love old forms, I have attached a scan of the postal form and attached it to the bottom of this post and you can click on it to enlarge.


I assume it is named “Broken Glass” as the bright colors of the brightly colored Jell-o squares wrapped in the pineapple creamy blanket resemble a stained glass window.  Why it got a “salad” tossed into the name I can only assume was due to the tossing of all of the pie ingredients in together.


Over the years I have only found a couple of people who remember this one.  If you do, please let us know.


Crust
1 1/2 cup graham cracker crumbs

1/2 stick butter

1/3 cup sugar


Pie Filling

1 package Strawberry Jell-o

1 package Lime Jell-o

1 package Orange Jell-o

1 cup pineapple juice

1 envelope plain gelatin

1 cup of cold milk

2 envelopes of Dream Whip

1/2 cup of powdered sugar


  1. Prepare each package of Jell-o separately using 1 1/2 cups of hot water for each.  Stir to make sure all of the Jell-o is completely dissolved. Pour each into a separate pan to in a thin layer.  You can use 9″ cake pans or any other pan that will give you a layer around 1/4 inch thick.  Put in the refrigerator and let cool until completely set.
  2. Prepare crust by mixing the graham cracker crumbs and sugar together, then adding the melted butter.  Pat the mixture into a deep pie plate to form a crust.  The filing for the pie will be a lot, so you will need to go high, or you can use a rectangular glass pan to spread out a little more.
  3. With a knife, cut the firm Jell-o in a grid pattern to form squares of about 1/4 inch square.  They certainly do not need to be perfect as the imperfection of size adds to the look of the “broken glass”. With a spatula remove all of the  Jell-o pieces from the pans  into  one large bowl of the combined flavors.  Place the bowl back in the refrigerator and keep cold until needed again.
  4. Mix  1 cup pineapple juice with the envelope of unflavored gelatin and 1/4 cup of cold water.  Heat until the gelatin is dissolved.  Remove from heat and let it stand until it has a cloudy or milky look.   Make sure it is completely cooled before pouring into the final mixture.
  5. Chill beaters and then beat 1 cup of cold milk with 2 envelopes of Dream Whip.  Beat until it peaks.  Add 1/2 cup of powdered sugar and mix.  Fold in the pineapple mix and Jell-o.  Pour into the pie shell.  Refrigerate to let set another 1-2 hours.


Share this:
Share this page via Email Share this page via Stumble Upon Share this page via Digg this Share this page via Facebook Share this page via Twitter
Posted in Recipes | Tagged , , | Leave a comment

Onions In Your Burger

If you like cooked onions on your burger, try cooking it inside of the burger, not in pieces but as a whole slice.  The onion will cook inside and the juices will keep your burger juicer even if you like a little well done.  We make two very thin burger patties, salt and pepper them, place a slice of onion in the middle of one of the patties, cover it with the other patty, and then seal the edges of the two patties together around the slice of onion.  Thick and delicious!  Give it a try!

Share this:
Share this page via Email Share this page via Stumble Upon Share this page via Digg this Share this page via Facebook Share this page via Twitter
Posted in Kitchen Tips, Recipes | Tagged , , , | Leave a comment

Coleslaw


As we get ready to head into the Memorial Day weekend it is time to remember all of the brave men and women who have died in our nation’s service. For many of us it is also a time to get out into the warm, fresh air and shake off the dust of winter.


Memorial Day was always the first picnic of the summer season for us. You need a good coleslaw for any picnic. My grandma used this recipe and for me it has an excellent balance of the sweet and tart, but the secret to any good coleslaw is finding your perfect balance of the two.


At Chef’s Joy we hope that each of you have a wonderful and safe Memorial Day weekend filled with lots of family and friends. Please take the time to honor the men and women who have died so that we can be free.


2 Ib green cabbage, cored and cut into 3-inch chunks, then finely chopped or shredded
1 medium onion, finely chopped
1 large green bell pepper, finely chopped
1 large carrot, coarsely grated
1  1/4 cups mayonnaise
1/3 cup cider vinegar
2 tsp sugar


Toss all of the vegetables in a large bowl with 1 tsp each of salt and pepper. Whisk together mayonnaise, vinegar, and sugar, then toss with the vegetable mixture. Chill, covered, stirring occasionally, at least 1 hour but it is better longer as it allows the vegetables to wilt and flavors to blend. The slaw can be chilled up to 1 day.

Share this:
Share this page via Email Share this page via Stumble Upon Share this page via Digg this Share this page via Facebook Share this page via Twitter
Posted in Recipes | Tagged , , | Leave a comment

Keeping your disposal fresh

Need an easy way to keep your disposal fresh using items you have in your pantry?  We keep distilled white vinegar frozen in ice cube trays.  When we need a refresh, we toss a few cubes into the disposal with some cold water and turn it on until the cubes are ground up.

Share this:
Share this page via Email Share this page via Stumble Upon Share this page via Digg this Share this page via Facebook Share this page via Twitter
Posted in Kitchen Tips | Tagged , , | Leave a comment

Sugar Cookies

Sugar Cookies

Sugar Cookies


Forgive my sugar indulgence today, but a friend of mine has been going through a rough patch and she loves sugar cookies so I made a batch to take to her. I have to admit to having a very active sweet tooth and sugar always makes me feel better.


I got this recipe from my grandmother, but as with all recipes you have no idea where they originated from. A couple of years ago I was reading Nancy Baggett’s, The All American Cookie Book, which had an almost identical recipe with just slightly less vanilla. First off Nancy’s book is a real favorite of mine and if you do not have a copy you should get one in our store. I have to say I really love how she has traced the history of the recipe.


In her book Nancy attributes the recipe to a liniment maker and travelling salesman Joseph R. Watkins. She says, “I discovered this exceptionally tasty version in the Watkins Cook Book, an influential product promotion cookbook first published in 1936 by the Minnesota-based J. R. Watkins Company. The company was founded in 1868 by liniment maker and traveling salesman Joseph R. Watkins. By the 1930s, the firm had become the nation’s largest food and medicinals distributor, with 10,000 “dealers” selling more than 300 products door-to-door.” The original recipe called for Watkins Vanilla which they sold.


While these make a great decorated Christmas cookie, they also make a great everyday indulgence cookie as well. Since it is an indulgence that I usually make to give away, I make them into large cookies stamped out with the bottom of a sugared glass for a little extra sweetness on top, not that they in any way needed any more sugar.


2 1/2 cups all-purpose white flour, sifted after measuring
1 teaspoon baking powder
1 cup (2 sticks) unsalted butter, slightly softened
1 cup sugar
2 large egg yolks
Generous pinch of salt
2 teaspoons vanilla extract, this is where we differed as we had 2 1/2 for a more vanilla flavor
Sugar to decorate


Pre heat oven to 375 degrees. Grease several baking sheets or coat with non stick spray.


In a large bowl, thoroughly stir together the flour and baking powder and set it aside. In another large bowl, with an electric mixer on medium speed. beat together the butter and sugar until well blended and fluffy.
Beat in the egg yolk . then the salt and vanilla, until evenly incorporated. Gradually beat or stir in the flour mixture to form a smooth dough.


Just making large sugar cookies


Roll pieces of the dough into 1″ balls. Place on the cookie sheet leaving plenty of room for the cookies to expand as they are mashed out. Place a thin layer of water in a bowl. Place a thin layer of sugar in another bowl. Dip the glass bottom in the water and then in the sugar to coat the bottom of the glass. Use the glass bottom to mash the balls out to a round shape to a little over 1/8″ to 1/4″ thick depending on how thick and crunchy that you like them. Place in the center rack in the oven and bake until the edges of the cookies are a golden brown about 8-11 minutes.


If you are going to cut into shapes and decorate


Divide the dough in half and place each portion between two large sheets of wax paper. Roll out each portion until it is 1/8 inch thick. Be sure to check both sides and smooth out any wrinkles that form. Stack the rolled portions (paper still attached) on a baking sheet and refrigerate until cold and firm about 30 minutes. If you are in a rush you can freeze the dough for about 15 minutes to speed up the process.


Remove one of the portions from the refrigerator and leave the other one cold and chilling. Peel away both pieces of waxed paper. Place the dough back on one of the sheets and cut with your cookie cutters to the desired shapes. If the dough softens too much place it on a baking sheet and put back in the refrigerator or freezer until firm again. Using a spatula, carefully transfer the cookies to the baking sheets, spacing about 1 inches apart. Re-roll any dough scraps. Continue cutting out the cookies until all the dough is used. Decorate the cookies with anything that you wish.


Bake the cookies, one sheet at a time, in the upper third of the oven for 8 – 11 minutes, or until lightly colored on top and slightly darker at the edges. Cool the cookies on a rack.


Share this:
Share this page via Email Share this page via Stumble Upon Share this page via Digg this Share this page via Facebook Share this page via Twitter
Posted in Recipes | Tagged , , | Leave a comment

Elevate your lids

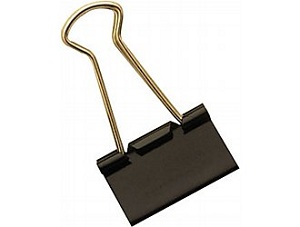
I keep a box of binder clips in the kitchen for a variety of  uses.  Ever have a problem trying to keep a pot top askew, slightly elevated during cooking, or to keep it from rattling?  Simply clamp one of these on the side of your pot and when you put the lid on it will keep it slightly elevated.  They also work well as cookbook page holders, chip bag sealers,  etc.  What have you used a binder clip for in the kitchen?


Share this:
Share this page via Email Share this page via Stumble Upon Share this page via Digg this Share this page via Facebook Share this page via Twitter
Posted in Kitchen Tips | Tagged , | Leave a comment