It is that time of the year to dust off winter and finish your spring cleaning. When I want clean, streak free windows I use a mixture of corn starch and water to clean them. I use used newspaper as my towels. This combination produces a streak free shine, and best of all you can let the corn starch/water mixture sit and the corn starch will settle to the bottom, then you can pour the water off and reuse the starch the next time you need to clean glass. What do you use?
Lemon Glazed Carrots
This time of year is my favorite, not only because it is warmer, but also that I get to spend lots of time in the fields harvesting fresh vegetables and fruits. This week I picked 50 lbs of blackberries and canned some into jam and some just in a light syrup for ice creams, pies/cobblers, etc for the rest of the year when you cannot get them on the farm. This week I will be doing raspberries and boysenberries. So today while I was harvesting carrots, I noticed that there a lot of lemons ripe on the tree, which made me think about cooking lemon glazed carrots tonight. Simple but delicious, I hope you enjoy it.
1 lb carrots
salt
3 tbsp butter
2 tbsp sugar
4 thin slices of lemon
In a medium saucepan bring salt and water to a boil. Wash the carrots and cut diagonally into 1 inch pieces. Place the carrots in the water and simmer, covered, 15 minutes or
until tender. Drain the carrots.
In a medium skillet melt the butter. Stir in the sugar then add the lemon slices and carrots. Cook over medium heat
stirring occasionally until the carrots are glazed.
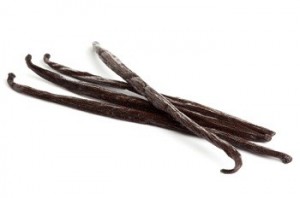
Dry Vanilla Beans
Vanilla beans add great flavor to your recipes, but they can be expensive. When I find the beans on sale I normally stock up on a few. If you find your beans have dried or shriveled and you need to remove the seeds, put them in a bowl, put in enough half and half or cream to cover, and microwave on medium for 1-2 minutes (do not boil). Remove them from the cream and they will be soft so you can split and remove the seeds. Save the cream as it is great in your coffee!
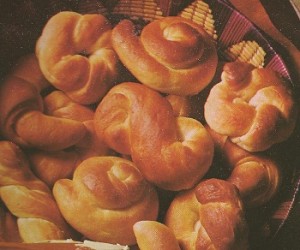
Refrigerator Potato Rolls
I just put the dough for refrigerator potato rolls in the refrigerator to rise. These are easy and flexible dinner rolls and the dough can be made in advance and kept in the refrigerator for 1-3 days. Try putting some in the fridge today!
1/2 cup warm mashed potatoes
1 1/2 cups warm water 105-115F
2 packages active dry yeast
1/2 cup sugar
1 tbsp salt
2 eggs
1/2 cup butter softened
6 1/2 cups all purpose flour
melted butter or 1 egg beaten with 2 tablespoons water
poppy seeds, sesame seeds optional
Prepare mashed potatoes for 1/2 cup.
In a large bowl place 1 1/2 cups of warm water that is at 105 to 115F. Water that is too hot will kill the yeast, too cold will slow down the yeast action and cause the rolls not to be as light. Sprinkle the yeast over the water. Add the sugar and the salt and stir with a spoon until completely dissolved. Let stand a few minutes and the mixture will start to bubble slightly.
Add eggs, butter, mashed potatoes, and 3 cups of flour to the mixture. Beat with an electric mixer on high until all of the ingredients are combined and the mixture is smooth. Add 2 cups of flour and stir with a wooden spoon until completely incorporated and smooth. Add the remaining 1 1/2 cups of flour mixing with your hands until smooth and stiff enough not to stick to the side of the bowl. Brush the top of the dough with 1 tbsp melted butter, cover with a piece of waxed paper and a dish towel and place in the refrigerator for 2 hours, or until the dough has doubled in bulk.
Remove from refrigerator and punch down with your fist. Cover and refrigerate. The dough can be refrigerated for 1-3 days punching it down once a day.
2 hours before you are ready to serve , remove the dough from the refrigerator and shape. These make great crescents, figure 8s, snails, or fan-tan rolls done in a muffin pan. After shaping the dough, cover with a towel and let rise in a warm place (85F) until double in bulk, 1 hour. Preheat oven to 400F. Brush rolls with butter or with egg and seeds if you are using. Bake 12 minutes or until golden. Serve warm.
Avoiding Beet Stains
Beets were coming in at the farm this weekend and I had just opened my last jar of pickled beets. I love beets, but hate the stains that they leave on your hands. You can stop the stains by rubbing the hand that will be handling the beats in vegetable oil before touching. Afterwards just wash your hands with hot soapy water and your hands will be stain free.
Basil Gimlet and Basil Syrup
So it is almost the weekend and while it is not officially summer until July 21st, the late days of Spring have delivered us some fresh basil and a Friday mood for a great cocktail. For those of you who love a good cocktail, this is a refreshing treat. For those of you who do not partake in spirits, the basil syrup is also excellent drizzled with fresh fruits, over a panna cotta, or put a little in your iced tea for a little flavor.
Basil Gimlet
2 oz basil syrup (recipe below)
1.5 oz gin
1 oz lime juice
Basil Syrup
1 cup granulated sugar
3/4 cup water
1/2 cup chopped fresh basil leaves
In a saucepan combine the sugar and water. Put it over medium heat and stir to help the sugar dissolve. Once the sugar has dissolved and the syrup is hot, take it off the heat and add the chopped basil. Allow the syrup to cool for 15 minutes, strain it through a fine mesh sieve, and discard the basil. The syrup may be made up to 2 weeks in advance and refrigerated in an airtight container until ready to use.
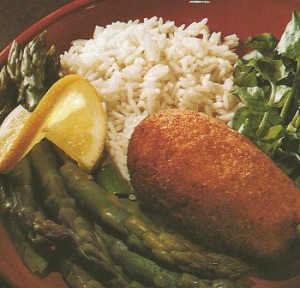
Chicken Kiev
Maybe this one is just a blast from the past for me, but I remember fashionable people in the 70s serving Chicken Kiev at dinner parties. Some research suggested that this dish was at it’s heyday in the late 60s and early 70s. I have not seen much of it since then. While it’s origin is unknown the dish is considered to be Ukrainian in origin, although we did find information claiming that it was invented in France and named in New York to appeal to immigrants from Eastern Europe. While we do not know where it originated, we do know that it is a simple and elegant dinner with lots of flavor. I have seen recipes where people like to add chives, dill, and other herbs to their butter. Do not be afraid to experiment with the flavors that you like the best.
Herb butter
1 cup butter softened
2 Tbsp chopped parsley
1 1/2 tsp dried tarragon leaves
1 clove garlic, crushed
3/4 tsp salt
1/8 tsp pepper
6 boned whole chicken breasts about 3/4 lb each
3/4 cup flour
3 eggs beaten
1 1/2 cup bread crumbs
oil for frying
To make the herb butter use a small bowl, with rubber scraper to thoroughly mix the butter, parsley, tarragon, garlic, salt, and pepper. On a sheet of foil, shape into 6-inch square. Freeze until firm-about 40 minutes.
Wash chicken and dry it well with paper towel. Using a small sharp knife, carefully remove skin. Cut each breast in half. To flatten the chicken, place each half, smooth side down, on a sheet of waxed paper; cover with second sheet. Using a mallet or side of saucer, pound chicken to about l/4-inch thickness, being careful not to break the meat.
Cut frozen butter into 12 pats. Place a pat of the herb butter in center of each piece of chicken. Bring the long sides of the chicken over butter; fold ends over, making sure that no butter is showing; fasten each piece with toothpicks. This is very important to keep the herb butter inside during frying.
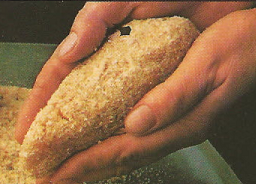
Roll each chicken piece in the flour on a sheet of waxed paper. Dip each in beaten eggs and roll in crumbs, coating evenly. Then shape each piece with palms your hands (see picture below), into triangles Refrigerate, covered, until chilled for about 1 hour.
In a Dutch oven or large, heavy saucepan, slowly heat oil (3 inches deep) to 360F on deep-frying thermometer. Add the chicken pieces, 3 at a time. Fry, turning with tongs, until browned-5 minutes. Drain. (Do not pierce coating.) Keep warm in 200F oven 15 minutes (no more) in a large pan lined with paper towels.
Half a Cup
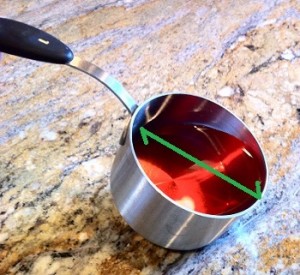
Ever been working a recipe and find yourself without the proper size measuring cup on the counter? You can accurately measure 1/2 cup by using a 1 cup measuring cup and tilting it until the liquid touches the edge of the top ring, and the top of the flat bottom ring on the opposite side of the cup. This works to convert a 1/2 cup to a 1/4 cup or a 1/4 cup to a 1/8 cup as well. Give it a try.
Glass Measuring Cups or Glasses Stuck Together
Do your glass measuring cups and glasses ever get stuck together and you are afraid that getting them apart will break them? Place ice in the top cup, then place the bottom cup/glass in warm tap water. The contrast in temperatures will loosen them allowing you to remove safely.


